Windows Embedded Standard 7 build 99
| Build of Windows Embedded Standard 7 | |
 | |
| Release name | Community Technology Preview 1 |
|---|---|
| OS family | Windows NT |
| Version number | 1.0 |
| Build number | 0099 |
| Build revision | 0 |
| Architecture | x86, x64 |
| Build lab | FBL_Embedded_Win7_Dev |
| Compiled on | 2009-07-29 |
| Base build | |
| 6.1.7231.winmain.090608-1900 | |
| Expiration date | |
| Timebomb | 2010-08-15 (+382 days) |
| SKUs | |
| Embedded | |
| About dialog | |

Windows Embedded Standard 7 build 99 is the official Community Technology Preview 1 build of Windows Embedded Standard 7 (identifying as simply "Windows Embedded Standard"), which was released on 1 September 2009[1]. It is based on Windows 7 build 7231, but contains an x64 architecture in addition to x86.
Setup[edit | edit source]
This build contains a much different setup compared to other SKUs of Windows 7. Rather than deploying an install.wim and installing a SKU of their choice only, the user is given many questions during setup.
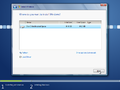
When booting into setup, two options are available - deploying an answer file or WIM, and building an image for installation.

If choosing to deploy a WIM or answer file, a dialog will open, letting the user search around for your WIM or answer file.

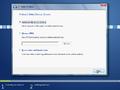
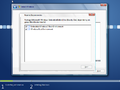
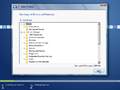
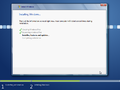
If the user decided to build an image instead, the user will be greeted with an End of User License Agreement, just like with any other release of Windows. Once agreeing, the user will be asked on how it wants to build the image. There are two main options - using an existing template, or creating a custom image.
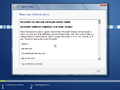
EULA
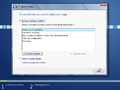
Choose how to create your own image


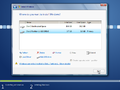
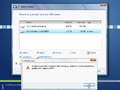
If an existing template is choosed, the user will be able to click next, where the user would select what language, time currency/format and keyboard/input method to install. When clicking next once again, a summary of what drivers/applications will be installed appears. The user will have a chance to take a look at all of them and also modify them before it finally reached the stage where setup prepares the hard drive and starts installation.
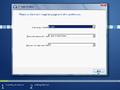
Language selection
Summary of drivers and features
Drive selection


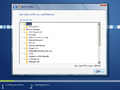
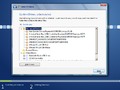
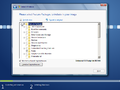
If the user choosed to build their own custom image instead, the user will be greeted by the language selection screen again. However, after proceeding to click next, the user will have the option to either automatically detect drivers, use a PMQ to detect devices and load drivers, or load minimal drivers. Once clicking next, the user will be able to confirm the loaded drivers and load any additional drivers. Once clicking next again, the user will be asked to install Feature Packs to include in the image. There is also text on the bottom right estimating what the OS footprint will be. If the next button is grayed out, that indicates that the user needed to resolve dependencies relating to the operating system. This usually occurs whenever the user has 2 or more features that commit the same tasks. Once resolving all dependencies, the user will be able to click next, where the user will meet the summary of drivers and features. The user cannot carry out any modifications here however. Upon clicking next once again, the user will be able to select where to install Windows.
Language selection
Choose or select drivers
Driver confirmation
Choose features to install
Feature dependencies
Summary of drivers and features (without the ability to edit)
Drive selection


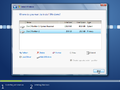
Once the user has finally arrived at the disk selection, the user will be able to choose what disk to install Windows on - with the addition of two more features not found in regular Windows installations. These are creating system partitions and hiding/showing USB flash drives. If a USB drive is plugged into the computer, setup will show the USB drives, unless the user chose to hide them. The user can also create a separate system partition - however this is grayed out and set to true if there isn't an available system partition on any of the attached storage devices.
USB drive showing in setup
Error dialog around why Windows cannot be installed on the USB flash drive
System and default partitions


After clicking next, the user is ready to go. Setup can now install Windows Embedded Standard 7 onto the system.
Installing Windows - notice how features and updates has been put to one

Due to how setup works, it will take quite a while to install - longer than normal releases of Windows. Once restarting twice, the user will finally reach the Out-of-box experience. It is majorly similar to Windows 7 build 7231, but without any wallpaper and with different branding.

OOBE

Differences between client and Embedded releases[edit | edit source]
- Most branding resources are not present in this build.
- The Start menu has fewer pinned apps.
Accessories[edit | edit source]
Most accessories found in other SKUs of this build have been removed, due to a lack of necessity for industrial use. In return, newer apps dedicated to this release of Windows have also been added; an example of this is the Windows Subsystem for UNIX-based Applications.
Bugs and quirks[edit | edit source]
- The wallpaper for the logon/logoff/OOBE screen does not show sometimes.
- Just like its base build, running Disk Cleanup with administrator privileges causes the application to crash.
Gallery[edit | edit source]
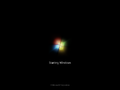
Setup boot screen

Boot screen

Welcome
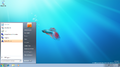
Start menu
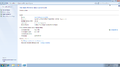
System Properties (notice the Windows edition field is missing)

Shutting down

Shutting down with the wallpaper


